Recently a colleague and myself found ourselves in a situation where we needed to produce a report on whether something was 'complete' or not. But oh wait, there's a bit more to that than a simple TRUE/FALSE flag.
Take phone specs for example, I found a data source that lists approximately 30 different phone specification categories. Imagine if this information needs to be 'complete before we can show it to people, we'll need to know where the gap is in order to know where to put our efforts.In plain language: 'what's complete and what still missing'?
Ok, so let's say I go ask my leader, out of the 30 various specs that each phone has, which ones must be complete? The "mandatory fields" so to speak. And this is his/her requirements:
- Year must not be null/blank
- Out of the 2G, 3G, and 4G fields, we need at least 1 of them to be filled in
- Weight must not be null/blank
- OS must not be null/blank
- RAM must not be null/blank
- Primary camera must not be null/blank
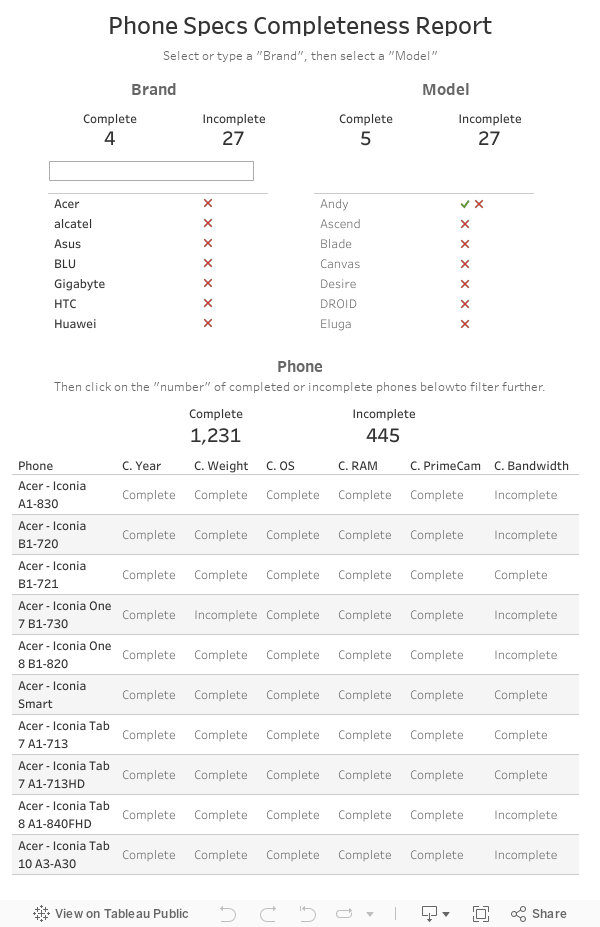
Also, in addition to the specific phones that are incomplete, they also wants to know the % of "brands" and "models" that's complete. A sort of status report so to speak. In essence, they wants a report that gives the following information:
- Which brands/models are complete vs incomplete? (if one phone within a brand is incomplete, then mark the entire brand incomplete.)
- Click on brand or model to see the phone within each grouping
- Which phones are complete vs incomplete? (if one field within a phone is incomplete, then mark the entire phone incomplete.)
- Click on phone to see which mandatory fields are complete vs incomplete
First, for all the fields that cannot be null/blank, I quickly made calculated fields for each of them:
IF ISNULL([Field])
THEN "Incomplete"
ELSE "Complete"
END

But for the bandwidth, only 1 out of 3 fields need to be filled in. So the calculated field is slightly different:
IF ISNULL([2G bands])
THEN
(IF ISNULL([3G bands])
THEN
(IF ISNULL([4G bands])
THEN "Incomplete"
ELSE "Complete"
END)
ELSE "Complete"
END)
ELSE "Complete"
END

Now I need to report on this completeness based on the following 3 dimensions:
- Per phone
- Per brand
- Per model
For phone, that's easy enough, all I have to do is create a calculated field based on each row:
IF [C. Bandwidth] = "Complete"
THEN
(IF [C. OS] = "Complete"
THEN
(IF [C. PrimeCam] = "Complete"
THEN
(IF [C. RAM] = "Complete"
THEN
(IF [C. Weight] = "Complete"
THEN
(IF [C. Year] = "Complete"
THEN "Complete"
ELSE "Incomplete"
END)
ELSE "Incomplete"
END)
ELSE "Incomplete"
END)
ELSE "Incomplete"
END)
ELSE "Incomplete"
END)
ELSE "Incomplete"
END

This essentially looks at all the columns and if one of the column is 'incomplete' then mark the entire record as incomplete. To me, on a visual level, it looks like this:

I'm using the information between Category 1 - 4 to determine what the overall flag should be for each row/phone.
But when it comes to Model or Brand, we have to look at a number of rows, and if out of that grouping of rows, one of them is 'incomplete', then mark that entire grouping of rows incomplete. Basically like this:

In this instance, I'm looking at each of the categories as well as the brand. as long as one of the overall flag for a brand is 'incomplete', flag all the rows in that particular brand 'incomplete'.
To do that, you could use the LOD function in Tableau. However, that only works on measures. How we did it, was to flag each row's complete/incomplete indication using numbers, then convert those numbers back into a string.
First, create a calculated field that turns the result per phone into a measurable number:

Now we can add them up. If all the records in the given brand are complete, the sum of all of them should still be 0. But if any of the rows are incomplete, then the sum would be greater than 0.
Create an LOD calculated field based on that measure:
IF
{FIXED [Brand]:SUM([C. Phone (measure)])} = 0
THEN "Complete"
ELSE "Incomplete"
END

I'm using the information between Category 1 - 4 to determine what the overall flag should be for each row/phone.
But when it comes to Model or Brand, we have to look at a number of rows, and if out of that grouping of rows, one of them is 'incomplete', then mark that entire grouping of rows incomplete. Basically like this:

In this instance, I'm looking at each of the categories as well as the brand. as long as one of the overall flag for a brand is 'incomplete', flag all the rows in that particular brand 'incomplete'.
To do that, you could use the LOD function in Tableau. However, that only works on measures. How we did it, was to flag each row's complete/incomplete indication using numbers, then convert those numbers back into a string.
First, create a calculated field that turns the result per phone into a measurable number:
IF [C. Bandwidth] = "Complete"
THEN
(IF [C. OS] = "Complete"
THEN
(IF [C. PrimeCam] = "Complete"
THEN
(IF [C. RAM] = "Complete"
THEN
(IF [C. Weight] = "Complete"
THEN
(IF [C. Year] = "Complete"
THEN 0
ELSE 1
END)
ELSE 1
END)
ELSE 1
END)
ELSE 1
END)
ELSE 1
END)
ELSE 1
END

Now we can add them up. If all the records in the given brand are complete, the sum of all of them should still be 0. But if any of the rows are incomplete, then the sum would be greater than 0.
Create an LOD calculated field based on that measure:
IF
{FIXED [Brand]:SUM([C. Phone (measure)])} = 0
THEN "Complete"
ELSE "Incomplete"
END

Apply this to Model, and now we can now look at this set of data in the way that was required (dashboard embedded). Hopefully this was helpful. Let me know what other ways have you used LODs before in the comments below.